Rocco’s Light Suits Explained: Mr. Hawthorne BTS
March 19, 2018
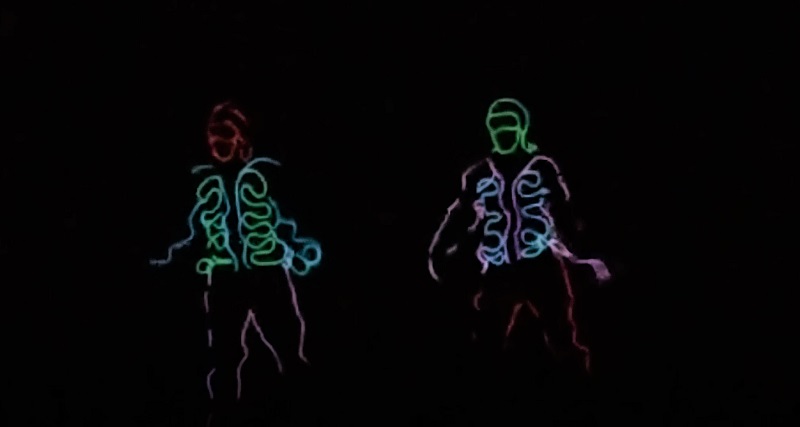
Mr. Hawthorne was an exciting time for students, faculty, and parents at Hawthorne High School. The Clarion congratulates Mr. Hawthorne of 2018: Tom Gallo, and Mr. Congeniality: Rocco Pecoraro. Many observant students enjoyed the dazzling light show that was Rocco’s act. It may have seemed simple on stage; however, it was much harder than one would think.
Two suits, worn by Rocco Pecararo and Krista Kedl were created, starting from total black suits. EL wire, or Electroluminescent wire, was sewn onto the suits to illuminate the performers on stage while dancing. EL wire is essentially a copper wire strand that glows when electricity is added and produces no residual heat or sound. It can also be manipulated and cut down to be sewn onto clothing, and became the essential choice for the creation of the dance suits.
The first step in creating the suits was to obtain different strands of EL wire and sew them onto black clothing. After that was finished, the next step was to find a method to power the lights, specifically inverters. Like battery packs, inverters provide power to lights through batteries or charging, and have special connectors to fit snugly into the EL wire. Since the realization came that many electronics would have to fit onto the suit, a black fanny pack was necessary to hold the inverters, and many other chips to come.
Now that the lights had power, they needed to be programmed to the beat of the music. An Arduino chip was used to store the code for the lights, along with several relays for each light which were put in the fanny pack. A relay can be thought of as a door that you can either open or close. Closing it will complete the circuit, powering the lights. Opening the relay will make the circuit incomplete, shutting off the lights. The basic hardware aspect of the suit was the programming would be done in the hard drive of the Arduino, which would pass the commands to the relay, either turning on or shutting off the lights at the desired times.
Finally, buttons were soldered onto the light-suits to run the program, thus activating the lights. There were many hours of problem solving and debugging in this project, however the end result was more than worth it.
Link to the original video here
Programmers:
James Ng
Michael Ptak
Joshua Kobuskie
If you want to make your own DIY light-suit, parts are listed here:
EL wire: https://www.adafruit.com/category/50
Inverters: https://www.adafruit.com/?q=inverters
Relays: http://a.co/aTIML4v